Setting Up Looking Glass
Background
A looking glass is a server that allows someone from outside the network to get information about the how traffic is routed through the network backbone of an organization. For example, suppose Alpha Corp. has one router in the US and another in Australia. An outside user wants to know how traffic towards Japan is routed from both of these Routers. As the user does not have credentials to the Routers, he cannot run traceroutes. The solution: a Looking Glass. If Alpha Corp. has a looking glass, the user can query about ping, trace, BGP and other information through the web-based looking glass without needing to authenticate to the actual router.
Setting Up
Before we start please make sure SELinux is disabled. Also, iptables should allow the required ports, from the top of my head – 23, 2601, 2605, 80. Phase 1: Working YUM Server
Make sure that your server has access to a good yum server, preferably repoforge. Information about how to add the repository of repoforge can be found at http://repoforge.org/use/
Phase 2: Downloading Necessary Prerequisites
Fortunately, the LG looking glass does not have many prerequisites. The following should suffice-
yum install wget perl-Net-Telnet perl-Net-Telnet-Cisco perl-XML-Parser httpd
Phase 3: Installing Looking Glass
Looking glass is freely available and can be downloaded and extracted using the following commands-
cd /root
wget http://www.version6.net/lg/lg-1.9.tar.gz
tar zxvf lg-1.9.tar.gz
mkdir /var/www/html/lg
Necessary files have to copied to /var/www/html/lg and permissions need to be corrected as well
cd /var/www/html/lg
cp /root/lg-1.9/lg.cgi .
cp /root/lg-1.9/favicon.ico .
cp /root/lg-1.9/lg.conf  .
chmod 644 *
chmod 755 lg.cgi
Phase 4: Tuning the Web Server
vim /etc/httpd/conf/httpd.conf

    Alias /lg/favicon.ico "/var/www/html/lg/favicon.ico"
    ScriptAlias /lg "/var/www/html/lg/lg.cgi"

service httpd restart
chkconfig httpd on
Part 5: Adding Routers
All routers are added in the file
/var/www/html/lg/lg.conf. Luckily, the file is self explanatory-
vim /var/www/html/lg/lg.conf

<!-- Test CISCO Router Section  -->

                <Separator>Sample Routers </Separator>

                <Router Name="Router-1">
                       <Title>Router-1</Title>
                       <URL>telnet://login:password@routerIP</URL>
        <!--EXAMPLE   <URL>telnet://login:123456@192.168.1.1</URL> -->
                       </Router>

                <Router Name="Router-2">
                       <Title>Router-2</Title>
                       <URL>telnet://login:password@routerIP</URL>
                       </Router>

                <Router Name="Router-3">
                       <Title>Router-3</Title>
                       <URL>telnet://login:password@routerIP</URL>
                       </Router>
Now, we should be able to access the Looking Glass via the URL: IP/lg e.g. http://192.168.100.100/lg
Phase 6: Tuning (Optional)
Log File
touch /var/log/lg.log
chown apache:apache /var/log/lg.log

vim /var/www/html/lg/lg.conf
<LogFile>/var/log/lg.log</LogFile>
Logo
Copy the logo file to
/var/www/html/imagesmkdir /var/www/html/images
vim /var/www/html/lg/lg.conf
<LogoImage Align="center" Link="http://www.companyweb.com/">/images/logo.png</LogoImage>
Headings
vim /var/www/html/lg/lg.conf
<HTMLTitle>ASXXXX-Looking Glass</HTMLTitle>
<ContactMail>noc@companyweb.com</ContactMail>

vim /var/www/html/lg/lg.cgi
#### In the closing section of the HTML tag i.e. </HTML>, the following line can be added-####
<I>
  Please email questions or comments to
 <A HREF="mailto:$email">$email</A>.
</I>
<P>
<P>
Powered By: <a href="http://wiki.version6.net/LG">Looking Glass 1.9</a></P>
</CENTER>
</BODY>
</HTML>
Screenshot
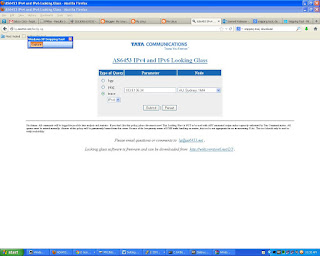 |
| TATA: AS6453 |
 |
| NovoCom: AS132267 |
Hope this helps :)


0 comments:
Post a Comment